Upload Logo
By default theme displays its standard logo in header. You can replace it with your logo image. Go to Appearance > Customize > Site Logo Click “Select Image” button and select logo image from your computer or media library.
Transparent Logo
Some pages use transparent logo instead of general logo for page with menu transparent option enabled. It’s easier for you to upload transparent logo just for these background image focused pages.
IMPORTANT: recommended transparent logo image in white color.
Favicon (Optional)
Favicon option is also on Appearance > Customize > Site Identity. Favicon is an icon for your site display in various places including browser address bar, or next to website name in bookmark list. You simply click select image button and select favicon file to upload (recommend .png file)
Display Retina Logo in Theme Setting
We built white label theme admin panel so you can display your logo on theme admin panel. Check if this option if you want that.
Menu Locations
- Primary menu – This is the main menu that shows in header area.
- Secondary Menu – This is the main menu that shows in header area when select “Center Logo + 2 Menus” layout.
- Top Bar Menu – This is the menu that will be used in top bar area.
- Side (Mobile) Menu – This is the menu that will be used for mobile devices.
- Footer Menu – This is the menu that shows in footer copyright area.
Theme support default WordPress custom menu option which you can organise each menu items using drag&drop in Appearance > Menus.
To use theme predefined menu layouts. First please navigate to Appearance > Customize > Navigation > General > Display Header Content From and select “General Menu Layout”

Menu Layouts Option
Theme Support various menu layouts and you can change it via Appearance > Customize > Navigation > General > Menu Layout.
Setting up Menu using WordPress Custom Menu
Theme Support custom WordPress menu, you can organise them into dropdown menu too.
Setup Primary Menu
- Go to Appearance > Menus. Click “Create Menu” button
- To add menu items, select one of your pages/posts on the left hand boxes. Then click “Add To Menu”.
- If you want to add custom link menu item (for example home link). Select “Links” and enter URL, Link Text there.
- You can organise your menu items using drag&drop functionality. Simple drag a menu item right below to the parent menu item.
- After setting up your menu, scroll down to the bottom of the page then assign the menu to “Primary Menu” in the Theme Locations box.
Setup Secondary Menu
If you select “Center Logo + 2 Menus” layout, you can also setup “Secondary Menu” so it displays as right logo menu. See above screenshot.
- Go to Appearance > Menus. Click “Create Menu” button
- To add menu items, select one of your pages/posts on the left hand boxes. Then click “Add To Menu”.
- If you want to add custom link menu item (for example home link). Select “Links” and enter URL, Link Text there.
- You can organise your menu items using drag&drop functionality. Simple drag a menu item right below to the parent menu item.
- After setting up your menu, scroll down to the bottom of the page then assign the menu to “Secondary Menu” in the Theme Locations box.
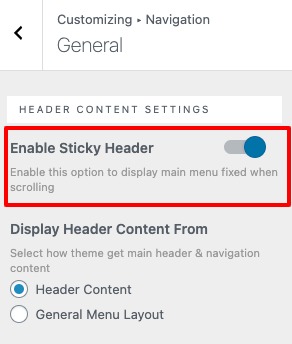
Sticky Menu (Optional)
If you enable sticky menu option. When visitor scroll down to page. The menu bar will stay at top while visitor scrolling. You can enable this option via Appearance > Customize > Navigation > General > Enable Sticky Menu
Icon Settings (Optional)
You can display icons link to cart or login popup next to main menu items. You can enable this option via Appearance > Customize > Navigation > General > Icon Settings.
- Show Cart Icon (Required Woocommerce plugin) – Enable this option to show cart icon which link to Woocommerce cart page along with main menu.
- Show Client Icon (Required ZM Ajax Login & Register plugin) – Enable this option to show client icon which link to client login page along with main menu.
Main Menu Typography & Colors
Manage your main menu typography and colors with ease. You can customise font family, font size, colors etc. through theme customizer via Appearance > Customize.

Main Menu Typography (Appearance > Customize > Navigation > Typography)

Main Menu Colors (Appearance > Customize > Navigation > Colors)

Main Sub Menu Colors (Appearance > Customize > Navigation > Sub Menu)


 Elementor will ask to connect Elementor to your website. You have to create Elementor account and connect it to your website within this process (If you have already connected to Elementor. You can skip this step).
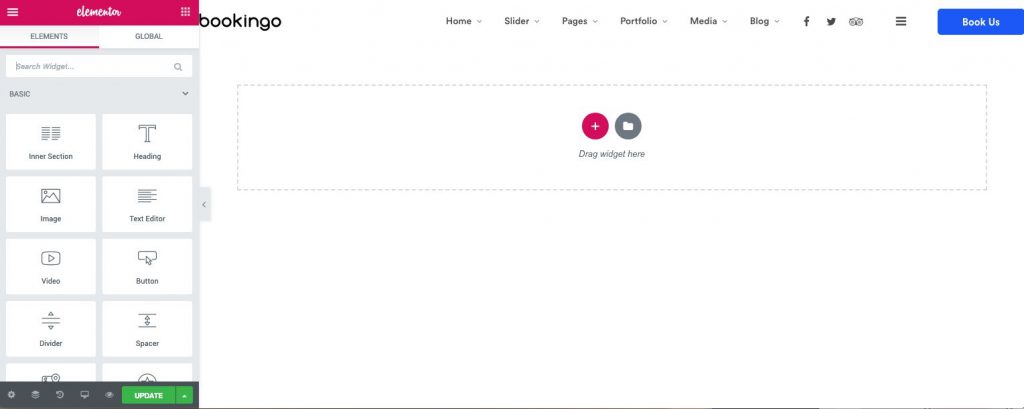
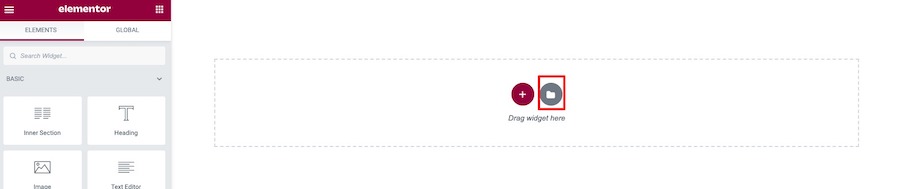
 You can use widget such as button to add link to mobile menu. By adding CSS ID “elementor_mobile_nav”. Please see below example of using button widget.


 Icon Settings (Optional)