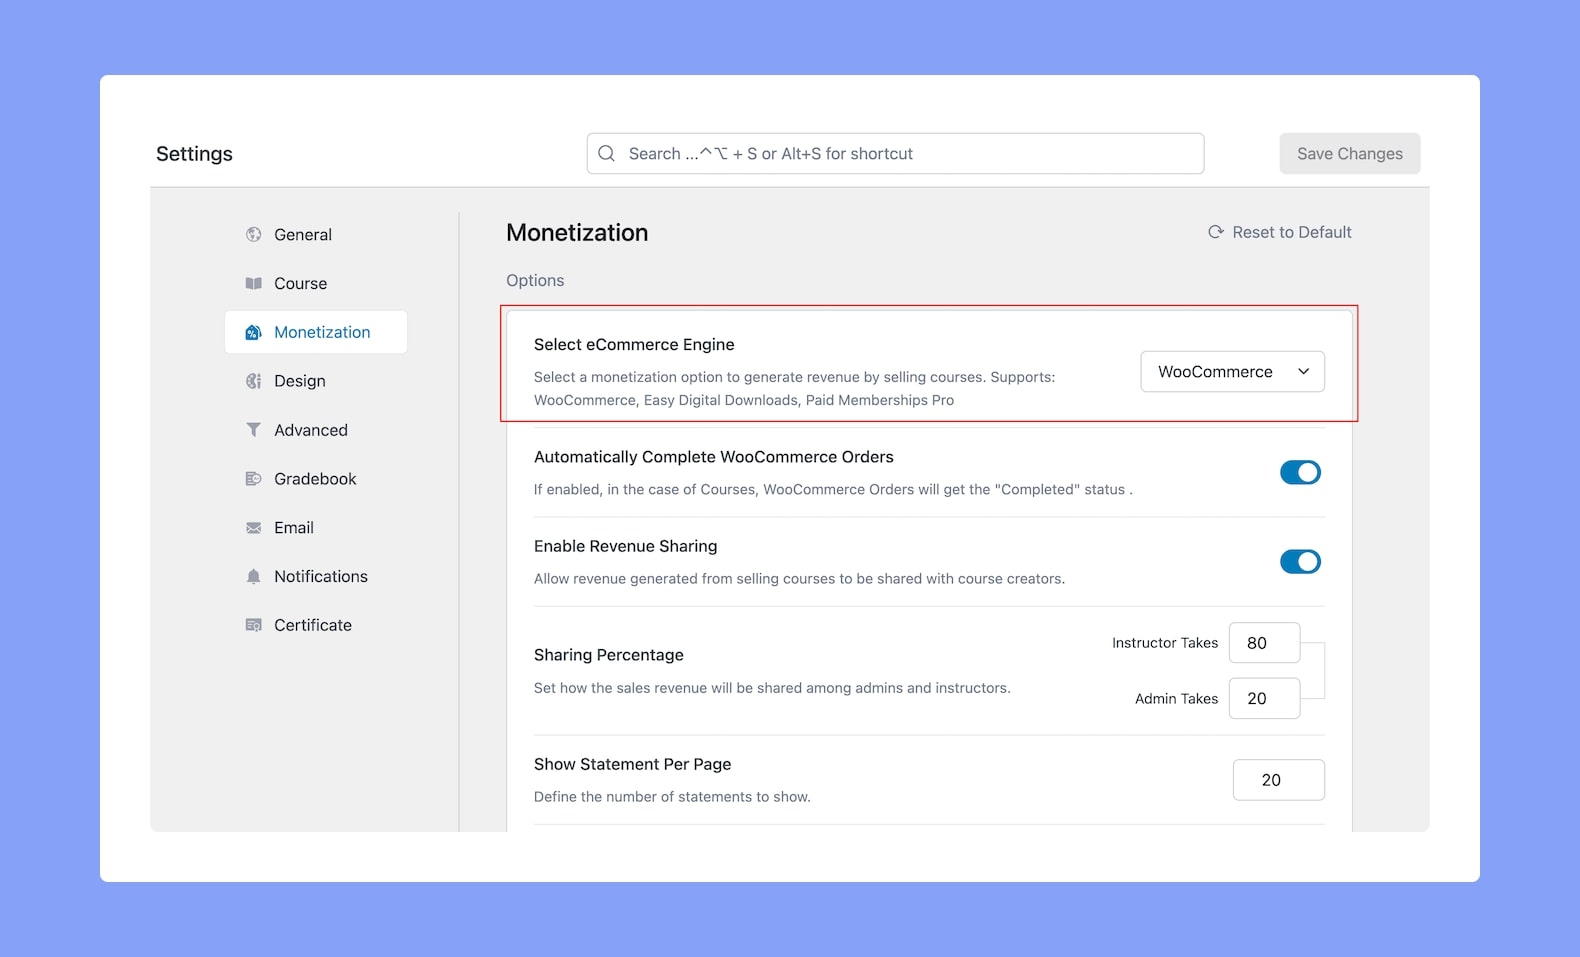
To use WooCommerce as your eCommerce platform, you need to enable WooCommerce from the Tutor LMS Settings.
To do this, navigate to WP Admin > Tutor LMS > Settings > Monetization and select WooCommerce as your eCommerce Engine.
Note: You’ll need to have the WooCommerce plugin installed and activated beforehand to see the WooCommerce listed as an option on the eCommerce Engine dropdown.
Making a Course Paid
Now, it’s time to learn how you can make a course paid using WooCommerce. There are a few simple steps involved so let’s go over what they are.
Creating a Product
The first thing you need to do is create a Product with WooCommerce. You can do this from WP Admin > Products.
Click on Add New to open the Product Creation Page. Here, give the Product a title — this can be the same as the Course Name to keep things simple.
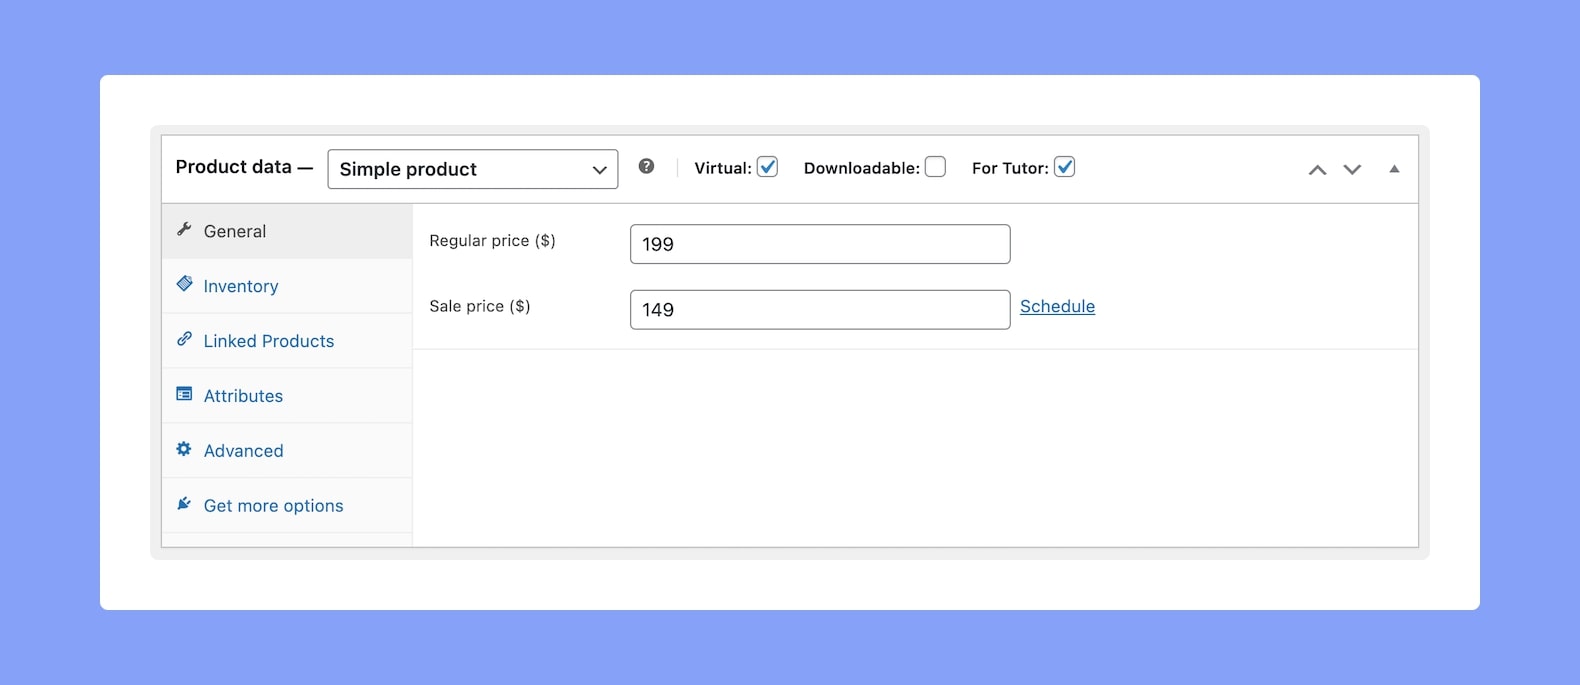
Then, in the Product Data section define the following features as they’re listed below:
Product Type – Simple Product
Virtual – Enabled
For Tutor – Enabled
Regular Price – Set a price of your choice
You can also set a Sale Price but that’s optional. Finally, click on Publish to save this product.
Linking a Product to a Course
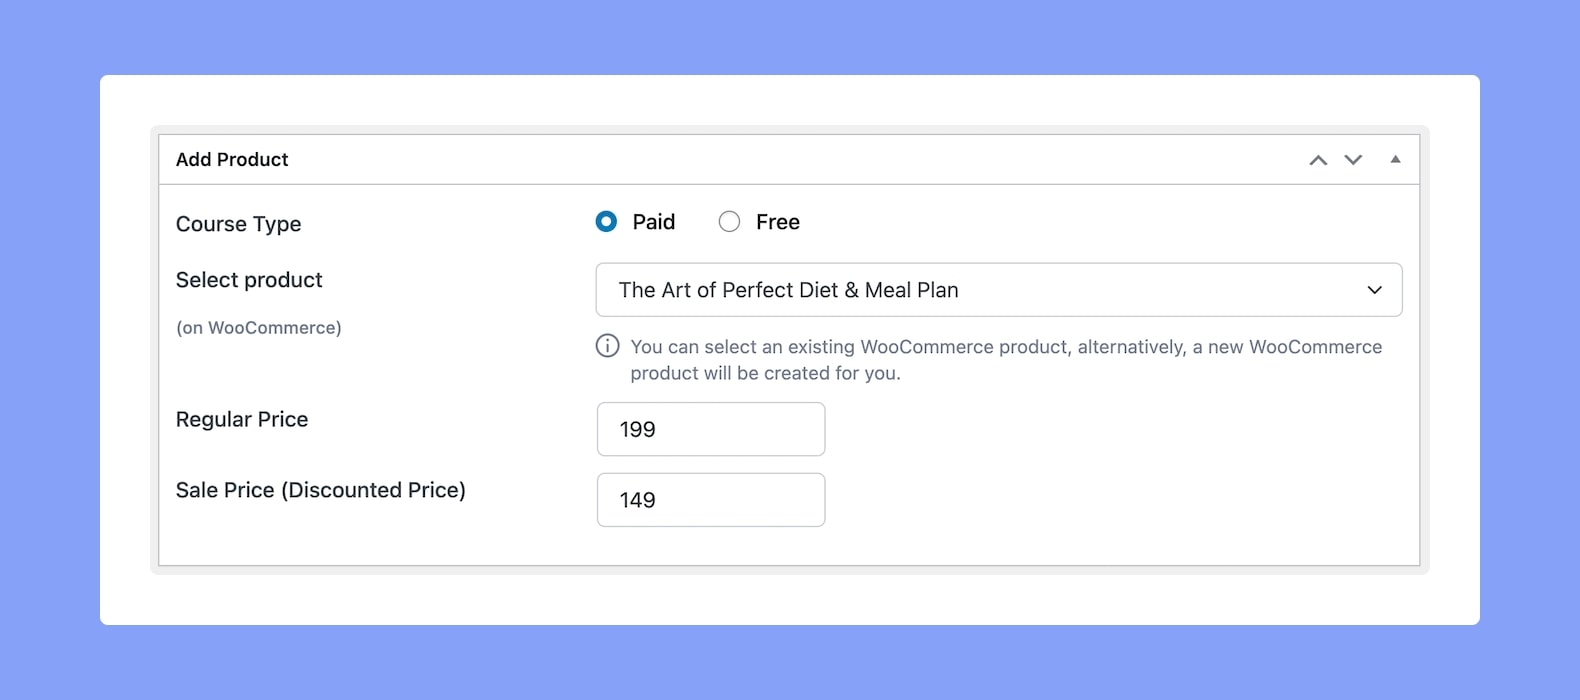
Now it’s time to link our product to our Course. To do this, visit your Course in edit mode. With the WooCommerce plugin activated and enabled, a new Add Product section should appear on your Course Creation Page.
Scroll down to this section and select the option Paid. Then, from the following dropdown, select the product that you made. Next, set a Regular Price (and Sale Price if desired) if it’s not set already. Finally, click on Update (or Publish, if you’re creating the course from scratch) to finish off.
If you’re using the Pro version of Tutor LMS, you’ll be able to use the Frontend Course Builder to directly make a course paid and define its price without having to create a product from the backend beforehand. This is because, from the Frontend Course Builder, paid course products are generated automatically.
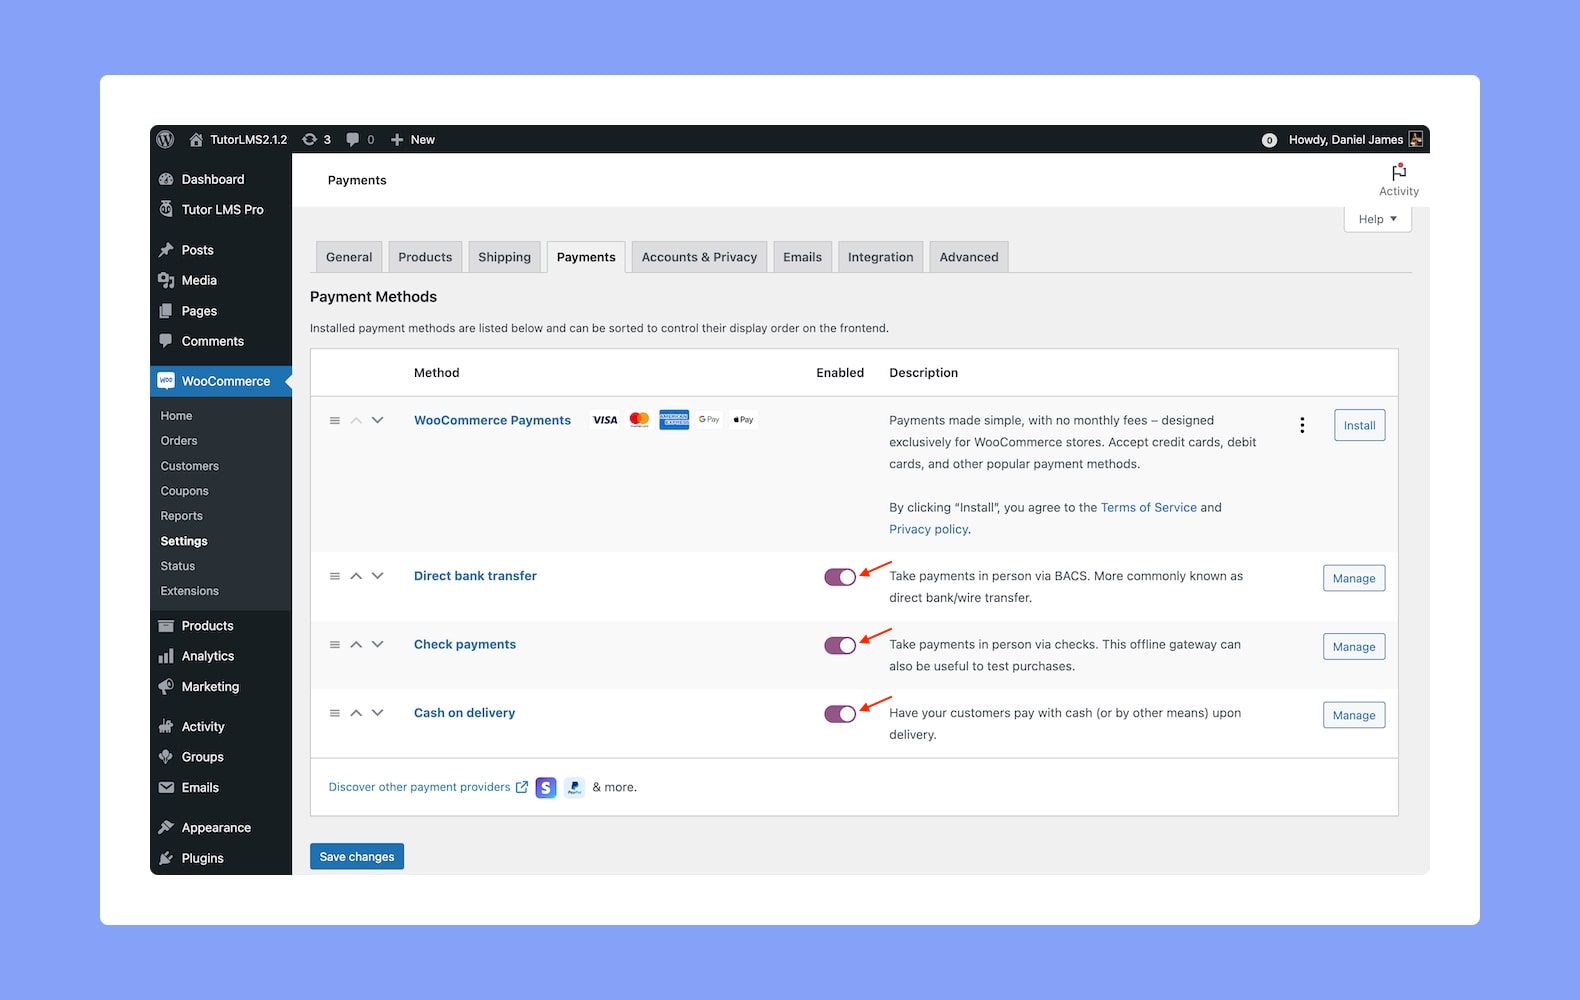
Setup Payment Method
The final step in this process is setting up your payment methods. To do this, find the WooCommerce Payment Settings from WP Admin > WooCommerce > Settings > Payments (tab). Here, enable and configure the preferred payment methods of your choice.
Now that that’s done, anyone will be able to add your course to their cart or to the wishlist and buy the course anytime they want!
You can integrate online shopping features by using one of the most popular shop WordPress plugin “Woocommerce”. In order to use it, you can download Woocommerce plugin for free from Woothemes.. Then follow below steps to install Woocommerce.
Log into your WordPress Admin area.
Look down the left hand column for “Plugins” and then click on the word “Plugins”.
Just to the right of the title “(Manage) Plugins” in the image above, you can see a button marked “Add New”, click this button.
The image above shows the option to upload the plugin from your own PC, Select the woocommerce.zip you had previously downloaded from Woothemes. Install the zip and click on “Activate Plugin”.
Then please find full documentation of “Woocommerce” plugin here
Woocommerce Page Setup
You should see a nice magenta banner “Welcome to WooCommerce – You’re almost ready to start selling :)”. WooCommerce needs some pages to be created for it to function, it can do this automatically for you by simply clicking “Install WooCommerce Pages”. (You can change these page names later if you want to).
Woocommerce General Settings
The first thing we need to do is setup where we are and our currency. These are simple dropdowns and you also get a third dropdown to allow you to limit which countries you are willing to ship to.
Next we get some Checkout and account options. Here you can configure things like enabling guest checkouts (so they don’t need to register an account with your site), you can force SSL on checkout pages (particularly useful if your payment gateway requires this), if you want to enable coupons (more on this later). You can also set some account functions like allow user registration without an order, whether to use email addresses for usernames and if you want to hide the WordPress Admin from customers.
You also get a couple of UI options including quite a nice Lightbox effect which I usually enable. Finally on this page we see our digital downloads options. With WooCommerce you can easily sell virtual and downloadable products these options allow you to define how they should be handled and how to grant access. The options are pretty self explanatory as with most of the WooCommerce setup.
Woocommerce Recommended Image Size
In Woocommerce settings. You can change product’s images size. From your WordPress admin dashboard. Go to Woocommerce > Settings > Products > Product Image Sizes. Below are recommended image size. After changing these settings you may need to regenerate your thumbnails.
Alright now you should have Woocommerce basic settings and ready to be used. However you can also configure other advanced settings ex. tax, shipping etc too. These are some more in-dept tutorials about how you can configure that options.
Open Appearance > Customize > Shop > Layout and you can customise shop page layout from fullwidth or with sidebar and columns. Also can change number of products display per page option.
Customise Single Product Options
Open Appearance > Customize > Shop > Single Product and you can customise product color scheme and option to displays related products.
Add a new product
Go to WordPress Dashboard > Products > Add New
Enter product title and description. You can use any shortcode or HTML to editing field.
Assign this product to category using categories box on the right side. Add tags to this product. Type tag name in to the field in Tags box on the right side.
Upload product featured image using set featured box on the bottom right side. All pages will use this image for post preview image and thumbnail.
You can set product meta data including price, sale price, shipping info, inventory etc. There are many options there and they are optional.
Once you finish, click Update.
Adding Product Widget to Elementor
If you want to display your products on custom shop page using Elementor. Simply create a page using Elementor and select “elements” tab and search for “product grid”.
You will find “Product Grid” widget there , drag it to where you want to display on the right side.
You can integrate online shopping features by using one of the most popular shop WordPress plugin “Woocommerce”. In order to use it, you can download Woocommerce plugin for free from Woothemes.. Then follow below steps to install Woocommerce.
Log into your WordPress Admin area.
Look down the left hand column for “Plugins” and then click on the word “Plugins”.
Just to the right of the title “(Manage) Plugins” in the image above, you can see a button marked “Add New”, click this button.
The image above shows the option to upload the plugin from your own PC, Select the woocommerce.zip you had previously downloaded from Woothemes. Install the zip and click on “Activate Plugin”.
Then please find full documentation of “Woocommerce” plugin here
Woocommerce Page Setup
You should see a nice magenta banner “Welcome to WooCommerce – You’re almost ready to start selling :)”. WooCommerce needs some pages to be created for it to function, it can do this automatically for you by simply clicking “Install WooCommerce Pages”. (You can change these page names later if you want to).
Woocommerce General Settings
The first thing we need to do is setup where we are and our currency. These are simple dropdowns and you also get a third dropdown to allow you to limit which countries you are willing to ship to.
Next we get some Checkout and account options. Here you can configure things like enabling guest checkouts (so they don’t need to register an account with your site), you can force SSL on checkout pages (particularly useful if your payment gateway requires this), if you want to enable coupons (more on this later). You can also set some account functions like allow user registration without an order, whether to use email addresses for usernames and if you want to hide the WordPress Admin from customers.
You also get a couple of UI options including quite a nice Lightbox effect which I usually enable. Finally on this page we see our digital downloads options. With WooCommerce you can easily sell virtual and downloadable products these options allow you to define how they should be handled and how to grant access. The options are pretty self explanatory as with most of the WooCommerce setup.
Woocommerce Recommended Image Size
In Woocommerce settings. You can change product’s images size. From your WordPress admin dashboard. Go to Woocommerce > Settings > Products > Product Image Sizes. Below are recommended image size. After changing these settings you may need to regenerate your thumbnails.
Alright now you should have Woocommerce basic settings and ready to be used. However you can also configure other advanced settings ex. tax, shipping etc too. These are some more in-dept tutorials about how you can configure that options.
Enter product title and description. You can use any shortcode or HTML to editing field.
Assign this product to category using categories box on the right side. Add tags to this product. Type tag name in to the field in Tags box on the right side.
Upload product featured image using set featured box on the bottom right side. All pages will use this image for post preview image and thumbnail.
You can set product meta data including price, sale price, shipping info, inventory etc. There are many options there and they are optional.
You can integrate online shopping features by using one of the most popular shop WordPress plugin “Woocommerce”. In order to use it, you can download Woocommerce plugin for free from Woothemes.. Then follow below steps to install Woocommerce.
Log into your WordPress Admin area.
Look down the left hand column for “Plugins” and then click on the word “Plugins”.
Just to the right of the title “(Manage) Plugins” in the image above, you can see a button marked “Add New”, click this button.
The image above shows the option to upload the plugin from your own PC, Select the woocommerce.zip you had previously downloaded from Woothemes. Install the zip and click on “Activate Plugin”.
Then please find full documentation of “Woocommerce” plugin here
Woocommerce Page Setup
You should see a nice magenta banner “Welcome to WooCommerce – You’re almost ready to start selling :)”. WooCommerce needs some pages to be created for it to function, it can do this automatically for you by simply clicking “Install WooCommerce Pages”. (You can change these page names later if you want to).
Woocommerce General Settings
The first thing we need to do is setup where we are and our currency. These are simple dropdowns and you also get a third dropdown to allow you to limit which countries you are willing to ship to.
Next we get some Checkout and account options. Here you can configure things like enabling guest checkouts (so they don’t need to register an account with your site), you can force SSL on checkout pages (particularly useful if your payment gateway requires this), if you want to enable coupons (more on this later). You can also set some account functions like allow user registration without an order, whether to use email addresses for usernames and if you want to hide the WordPress Admin from customers.
You also get a couple of UI options including quite a nice Lightbox effect which I usually enable. Finally on this page we see our digital downloads options. With WooCommerce you can easily sell virtual and downloadable products these options allow you to define how they should be handled and how to grant access. The options are pretty self explanatory as with most of the WooCommerce setup.
Woocommerce Recommended Image Size
In Woocommerce settings. You can change product’s images size. From your WordPress admin dashboard. Go to Woocommerce > Settings > Products > Product Image Sizes. Below are recommended image size. After changing these settings you may need to regenerate your thumbnails.
Alright now you should have Woocommerce basic settings and ready to be used. However you can also configure other advanced settings ex. tax, shipping etc too. These are some more in-dept tutorials about how you can configure that options.
Open Appearance > Customize > Shop > Layout and you can customise shop page layout from fullwidth or with sidebar and columns. Also can change number of products display per page option.
Customise Single Product Options
Open Appearance > Customize > Shop > Single Product and you can customise product color scheme and option to displays related products.
Add a new product
Go to WordPress Dashboard > Products > Add New
Enter product title and description. You can use any shortcode or HTML to editing field.
Assign this product to category using categories box on the right side. Add tags to this product. Type tag name in to the field in Tags box on the right side.
Upload product featured image using set featured box on the bottom right side. All pages will use this image for post preview image and thumbnail.
You can set product meta data including price, sale price, shipping info, inventory etc. There are many options there and they are optional.
Hotel Booking WooCommerce Payments is an extension for WordPress Hotel Booking plugin. This addon integrates WooCommerce payment gateways with the booking plugin. Use it to extend a number of payment gateways needed to handle online reservation of accommodations.
This plugin is available in Hoteller version 1.2 or higher.