If you’re building sales funnels and landing pages in WordPress, for yourself or your clients, Elementor is a bit of a dream come true.
Super easy to create conversion-focused landing pages, drag-n-drop, directly there in WordPress.
What are the Benefits of A/B Testing
A/B testing has many purposes with many benefits. It’s an all-encompassing type of analytical testing, where you can create unique tests or run something simple like how many users visit your webpage.
There is official article from Elementor website here“How to Do A/B Testing With Elementor” which has detailed steps and explanations about how to create A/B testing along with Google Analytic.
If you are looking for easier and simple solution for adding A/B testing for Elementor. You can also use this plugin “Split Test For Elementor” to create this options within Elementor without requiring Google Analytic.
We are using Elementor Page Builder plugin so you can use its drag&drop user interface to create your page contents. Here are detailed documention about how to use Elementor from its official page.
Mega Menu is extensive sub menu which allow you to display various of menu links or other rich information.
Creating Mega menu using Elementor
First please install and activate Elementor and Craft Theme Elements for Elementor plugins before you proceed.
Please see detailed instruction about how to install required and recommended plugins here.
Once you get required plugins installed. Please follow below steps.
Create mega menu content posts
We are using Elementor Page Builder plugin so you can use its drag&drop user interface to create your mega menu contents.
1. Please navigate to WordPress Dashboard > Mega Menus > Add New Mega Menu.
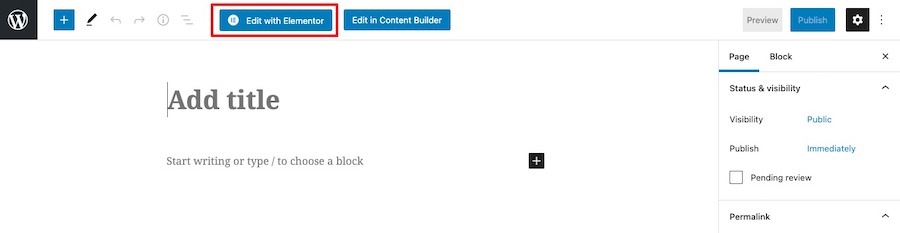
2. Then enter its title and click “Edit with Elementor” option.
3. Now you will open Elementor page builder editor. You can customize menu columns, contents including social icons, buttons, logo image etc.
Import Demo Mega Menu Templates
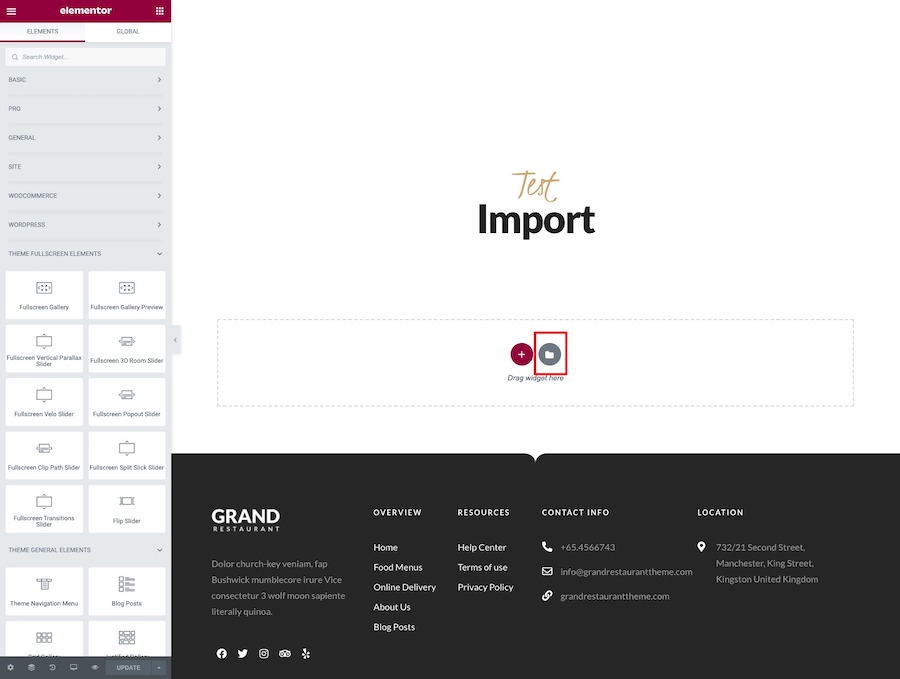
1. Click “Add Template” button and select “Blocks” section.
2. Then select “Theme Mega Menu” for select box option.
3. You will see list of predefined templates there. Select one you want to import and click “Insert”.
Assign Mega Menu Post content to parent menu item
1. One you have mega menu posts with content. The next step is to assign it to parent menu item. So when user move mouse over menu item. It will open selected mega menu.
2. Go to Appearance > Menus and selected parent menu item you want to assign mega menu post to.
3. Expand selected parent menu item, you will find “Elementor Mega Menu” option.
4. Then select mega menu you want to assign to this menu item.
5. Once you selected then click “Save Menu” button to save all changes.
First please install and activate Elementor and Craft Theme Elements for Elementor plugins before you proceed.
Please see detailed instruction about how to install required and recommended plugins here.
Once you get required plugins installed. Please follow below steps.
Setting up header & navigation menu using “Header Content” which build using Elementor page builder. It provides more flexibilities to fully customize main header content & layout.
First please navigate to Appearance > Customize > Navigation > General > Display Header Content From and select “Header Content”
Then look at “Default Header Content Settings” section.
Default Header Content – Select default header content for general pages & posts
Default Sticky Header Content – Select default sticky header content for general pages & posts
Default Transparent Header Content – Select default transparent header content for general pages & posts
You can select each header content options from your current header posts. However if you don’t create anything yet. Please follow below instructions.
Create header content posts
We are using Elementor Page Builder plugin so you can use its drag&drop user interface to create your header contents.
1. Please navigate to WordPress Dashboard > Headers > Add New Header. Then enter its title and click “Edit with Elementor” option.
2. Now you will open Elementor page builder editor. You can customize menu columns, contents including social icons, buttons, logo image etc.
3. Adding Navigation Menu Widget
If you want to display your custom menu which you have already created it in Appearance > Menus. Simply select “elements” tab and search for “navigation”.
4. You will find “Theme Navigation Menu” widget there , drag it to where you want to display on the right side.
Then you can customize its options including typography, margin etc.
5. Adding Side/Mobile Menu Link
You can use widget such as button to add link to mobile menu. By adding CSS ID “elementor_mobile_nav”. Please see below example of using button widget.
Import Demo Navigation Menu Templates
1. Click “Add Template” button and select “Blocks” section.
2. Select “Theme Navigation Menu” for select box option.
3. You will see list of predefined templates there. Select one you want to import and click “Insert”.
First please install and activate Elementor and Craft Theme Elements for Elementor plugins before you proceed.
Please see detailed instruction about how to install required and recommended plugins here.
Once you get required plugins installed. Please follow below steps.
Once you get required plugins installed. Please follow below steps.
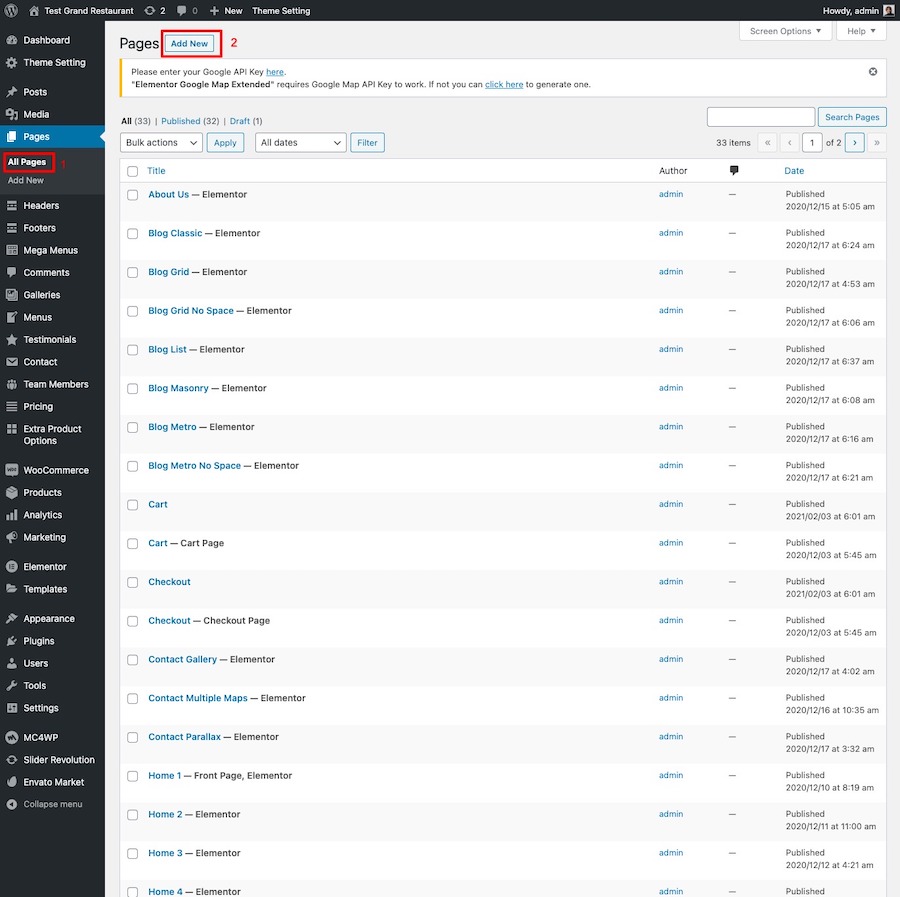
Create a page or edit an existing one.
Click “Edit with Elementor” button to open Elementor Page Builder.
Click “Add Template” button and scroll through “Pages” section.
You will see popup modal window. Click “Pages” tab to see a list of all page templates. You can filter only Craft templates and select demo page you want to import and click “Insert”.
Known Issue
If you have experience Craft template issue with Elementor library. Please make sure you update the plugin “Craft Theme Elements for Elementor” to v1.9
If you’re building sales funnels and landing pages in WordPress, for yourself or your clients, Elementor is a bit of a dream come true.
Super easy to create conversion-focused landing pages, drag-n-drop, directly there in WordPress.
What are the Benefits of A/B Testing
A/B testing has many purposes with many benefits. It’s an all-encompassing type of analytical testing, where you can create unique tests or run something simple like how many users visit your webpage.
There is official article from Elementor website here“How to Do A/B Testing With Elementor” which has detailed steps and explanations about how to create A/B testing along with Google Analytic.
If you are looking for easier and simple solution for adding A/B testing for Elementor. You can also use this plugin “Split Test For Elementor” to create this options within Elementor without requiring Google Analytic.
We are using Elementor Page Builder plugin so you can use its drag&drop user interface to create your page contents. Here are detailed documention about how to use Elementor from its official page.
Mega Menu is extensive sub menu which allow you to display various of menu links or other rich information.
Creating Mega menu using Elementor
First please install and activate Elementor and Starto Theme Elements for Elementor plugins before you proceed.
Once you get required plugins installed. Please follow below steps.
Create mega menu content posts
We are using Elementor Page Builder plugin so you can use its drag&drop user interface to create your mega menu contents.
Please navigate to WordPress Dashboard > Mega Menus > Add New Mega Menu. Then enter its title and click “Edit with Elementor” option.
Now you will open Elementor page builder editor. You can customize menu columns, contents including social icons, buttons, logo image etc.
Import Demo Mega Menu Templates
Click “Add Template” button and select “Blocks” section. Then select “Theme Mega Menu” for select box option.
You will see list of predefined templates there. Select one you want to import and click “Insert”.
Assign Mega Menu Post content to parent menu item
One you have mega menu posts with content. The next step is to assign it to parent menu item. So when user move mouse over menu item. It will open selected mega menu.
Go to Appearance > Menus and selected parent menu item you want to assign mega menu post to.
Expand selected parent menu item, you will find “Elementor Mega Menu” option. Then select mega menu you want to assign to this menu item.
Once you selected then click “Save Menu” button to save all changes.
First please install and activate Elementor and Starto Theme Elements for Elementor plugins before you proceed.
Once you get required plugins installed. Please follow below steps.
Setting up header & navigation menu using “Header Content” which build using Elementor page builder. It provides more flexibilities to fully customize main header content & layout.
First please navigate to Appearance > Customize > Navigation > General > Display Header Content From and select “Header Content”
Then look at “Default Header Content Settings” section.
Default Header Content – Select default header content for general pages & posts
Default Sticky Header Content – Select default sticky header content for general pages & posts
Default Transparent Header Content – Select default transparent header content for general pages & posts
You can select each header content options from your current header posts. However if you don’t create anything yet. Please follow below instructions.
Create header content posts
We are using Elementor Page Builder plugin so you can use its drag&drop user interface to create your header contents.
Please navigate to WordPress Dashboard > Headers > Add New Header. Then enter its title and click “Edit with Elementor” option.
Now you will open Elementor page builder editor. You can customize menu columns, contents including social icons, buttons, logo image etc.
Adding Navigation Menu Widget
If you want to display your custom menu which you have already created it in Appearance > Menus. Simply select “elements” tab and search for “navigation”.
You will find “Theme Navigation Menu” widget there , drag it to where you want to display on the right side.
Then you can customize its options including typography, margin etc.
Adding Side/Mobile Menu Link
You can use widget such as button to add link to mobile menu. By adding CSS ID “elementor_mobile_nav”. Please see below example of using button widget.
Import Demo Navigation Menu Templates
Click “Add Template” button and select “Blocks” section. Then select “Theme Navigation Menu” for select box option.
You will see list of predefined templates there. Select one you want to import and click “Insert”.


 You can use widget such as button to add link to mobile menu. By adding CSS ID “elementor_mobile_nav”. Please see below example of using button widget.