First you have to create a page using Elementor. Once you enter Elementor builder page. Look at the left sidebar panel then search for “event search form”.
Then add the widget to page content area on the right side. Click on the search form widget and you will see its options below.
You can customise search form fields and other colors options using Elementor widget options as well.
Next step is to add an event grid widget to displays the search results. Look at the left sidebar panel then search for “event search form”.
Then add the widget to page content area on the right side. Click on the event grid widget and you will see its options below.
You can customise event grid display options and other colors options using Elementor widget options as well.
Sometimes you may not want to sell tickets and charge a price for an event but would still like to have a list of people who will be attending. The RSVP ticket type in Event Tickets provides this functionality.
Instead of buying a ticket, entering credit card or PayPal information, or going through any other part of the checkout process, with the RSVP “ticket” option users just:
Select a quantity for how many spots to RSVP.
Enter their name and email address to confirm that they will be attending the event.
Immediately receive a simple ticket confirming their reservation at the email address they entered.
This article will show you how to enable and use the RSVP features of Event Tickets and Event Tickets Plus.
Note: There is no eCommerce or payment-collection functionality with RSVPs. This article is only about the RSVP feature; to learn about selling tickets with Event Tickets and Event Tickets Plus, check out the Making a Ticket tutorial.
Enabling RSVP Functionality
If you have The Events Calendar installed and activated on your site, then the Tickets meta box from Event Tickets will be enabled on Events automatically. It will show up in the wp-admin edit screen for the Events post type.
If you do not have The Events Calendar installed or would like to enable tickets on any other post type, first head to Tickets → Settings in your wp-admin. Once here, head to the “General” tab and check the boxes for each post type you want to use. Read more about Event Tickets settings.
Using RSVP Functionality
Adding a New RSVP
To add RSVPs, first head to the creation/edit screen for a post type on which Tickets functionality is enabled (e.g. your event or post). Scroll down and you will find the Tickets meta box.
If you don’t have any e-commerce functionality enabled to sell tickets, you’ll see a button that says + New RSVP. If you also have enabled Tribe Commerce (legacy), Tickets Commerce, or Event Tickets Plus (alongside an e-commerce plugin), you’ll see the + New Ticket button too.
The RSVP Ticket Fields
Clicking the + New RSVP button will open the Add New RSVP fields. You can then fill out the fields and click “Save RSVP”. The following shows the fields for RSVPs.
Many of the fields in the tickets meta box are self-explanatory, but let’s run through each just to be sure.
Type lets you set a unique name for the ticket type – which might be something like Standard, Adult, etc.
Capacity is the number of tickets that are available: if you leave this blank it is assumed that there is no limit. If you have a limited number of spots for your event, you’ll want to make sure to set this accordingly.
Advanced fields:
Description is a good space to add any information attendees might be interested in, such as bring waterproof jackets or not recommended for children. You can choose to show or not in the front-end ticket form.
Start sale dictates when the RSVP becomes available. If you’re using RSVPs on a post or page, this field is required. If you are making RSVPs on an event, you don’t need to set this field- by default sales will start when you publish the event or ticket.
End sale does the reverse – you can set this to a date after which users cannot RSVP. As with the start sale field, setting this is optional for events and the default is to stop sales when the event itself starts.
If you have Event Tickets Plus, you will also see an option here for collecting attendee information. This feature allows you to request additional information beyond the name and email of the person RSVPing. You can learn about this feature in our separate Attendee Information article.
Publishing the Content and Accepting RSVPs
Once you’ve entered all your content and have created RSVP tickets, you can now publish your content and let people RSVP for the event.
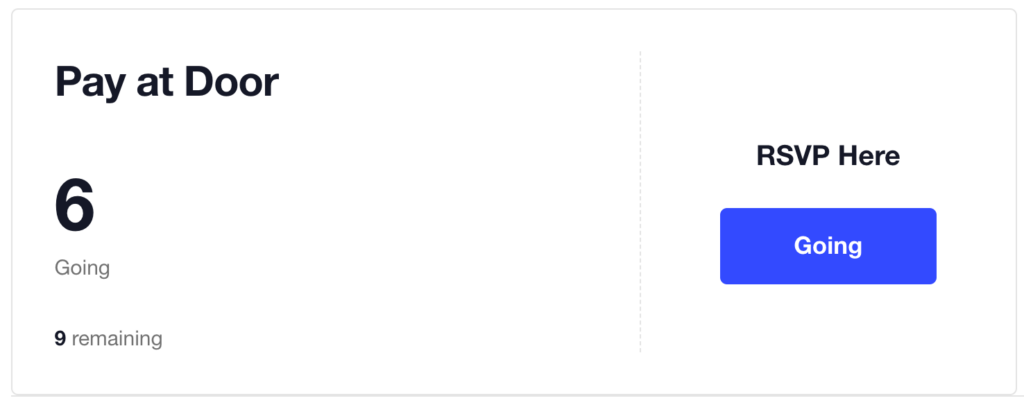
Once RSVPs are allowed according to the “Start Sale Date” option for your RSVP tickets, users will see something like this at the bottom of your ticketed content:
Users can RSVP with those fields and will receive a confirmation over email with their tickets. Here’s a screenshot of the default ticket layout that event attendees will receive over email:
With Event Tickets‘ free e-commerce solution, Tickets Commerce, you can sell tickets to your events for free. If you were previously using WooCommerce, but are looking to switch over to Tickets Commerce, you can easily make this change.
In fact, you can enable both e-commerce solutions at the same time if you prefer. We’ll show you how to do it here!
Enable Tickets Commerce
If you already have WooCommerce enabled for your tickets, but would like to enable Tickets Commerce as well, simply head over to Tickets > Settings > Payments and toggle on the option to Enable Tickets Commerce.
Once you click Save Changes, you’ll see options to connect to PayPal and Stripe. You can follow the prompts to set up one or both of these payment options for your users. Learn even more about setting up payments for Tickets Commerce here.
Setting up Basic Tickets
Tickets can be added to posts, pages, or events. In the Classic Editor, you will find the Tickets meta box below the main content of the post type:
When clicking on the + New ticket button you will be presented with some additional options:
Many of the fields in the tickets meta box are self-explanatory, but let’s run through each just to be sure.
Type lets you set a unique name for the ticket type – which might be something like Standard, Adult, Concession, etc.
Price controls the price of each ticket. If the tickets are not going to be sold – but rather you are going to give them away for free – you can leave this field blank or set it to 0.
Note: Leaving the price blank only works when using WooCommerce at this time. When using Tickets Commerce, the price field is required.
Capacity is the number of tickets that are available: if you leave this blank it is assumed that there is no limit and customers can buy as many as they would like. If you have a limited number of spots for your event, you’ll want to make sure to set this accordingly.
Advanced:
Ticket description is optional, but it’s a good space to add any information customers might be interested in, such as bring waterproof jackets or not recommended for children. You can choose to show or not in the front-end ticket form.
Start sale dictates when the tickets are available for sale. If you’re making tickets on a post or page, this field is required. If you are making tickets for an event, you don’t need to set this field – by default, sales will start when you publish the event or ticket.
End sale does the reverse – you can set this to a date after which the tickets should no longer be available for customers to buy. As with the start sale field, setting this is optional for events and the default is to stop sales when the event itself starts.
SKU lets you set a unique code to help identify the tickets. This is another optional field and is of most use to merchants with an existing stock-keeping unit system.
By default, the name and contact information of the person buying the tickets is collected during the purchase process. If you want to collect additional information (such as names of all attendees, t-shirt sizes, etc.) then you can implement the Attendee Information feature (Available only with Tickets Plus) by clicking + Attendee Information. This feature is explored in another article, and this walkthrough assumes that you do not need to collect additional information.
As soon as you’re ready, simply click on Save/Update Ticket and you’re done … and never fear, if you make a mistake you can correct it by clicking on the edit link (pencil icon) later on:
First please install and activate The Event Calendar plugin before you proceed. Once you get required plugins installed. Please follow below steps.
This is actually really easy. Let’s start in the WordPress dashboard – you should be able to find a menu entry called Events and, if you click on it, you should see the Add New link.
Once you’ve found it, go ahead and click on it! This should bring you to the event editor.
The event editor hopefully won’t contain too many surprises: it is intentionally almost identical – at least at first glance – to the regular page and post editor used by WordPress itself.
Just as with a page or post, you can add a title and description to your event. The expected controls for saving it as a draft or publishing it are present, too:
Event Time
Of course, events have specific bits of information associated with them that most pages and posts don’t require – start and end dates, for instance, not to mention venues and organizers.
Fields to set all of these things can be found below the description editor, in an area called the events meta box:
Let’s look at each of the settings in this area in turn. First, the date and time fields.
The Start/End – this is simply when the event starts and finishes. Clicking into either date field will pop up a date picker, where you may select your desired dates from a calendar. Event start and end times may be selected from a drop-down menu, or you may enter your dates and times manually if you prefer. If you already checked the All Day Event box you will not be able to specify a time for your event
The All Day Event checkbox is useful when the event is taking place on a particular date (or dates) – but you don’t really know when, or else feel that it is good enough to say it takes place “all day” without being more specific
The above covers creating a singular, non-recurring event. If you need help creating a Pro recurring event, you’ll want to read through our walkthrough tutorial on recurring events.
Event Venue
If this is your first time using The Events Calendar, you’ll see this list of fields for creating your first event venue. If you’ve created a venue for a previous event, you’ll have the option of selecting an existing venue from a drop-down menu (you may also type into the search box to narrow your options). Entering a new venue name and selecting the Create option from the menu options will display the new venue form fields below, allowing you to create a new venue for your event.
It’s also worth noting that you don’t need to create (or use) a venue. If you prefer not to specify a venue, simply move on to the next section.
Provide a name for the venue and any optional address details – if you like – a contact phone number and website. The last two checkboxes control whether a map should be shown to visitors and/or a link to a map should be displayed.
If your event is happening a little off the beaten path and there isn’t a mappable address, you can use latitude and longitude instead. To do this, leave the venue without an address. After you’ve created the event, go to Events > Venues and edit the Venue in question. You’ll see an option there for adding coordinates.
Organizers
Similar to the venue details, you can select any pre-existing organizer details that you have already entered. Also – just as with the venue details – this area is completely optional.
You do not need to provide organizer details and, if you do, you need only provide as much information as you want to. With The Events Calendar 3.11+, you can add multiple organizers to an event. Keep in mind that if you opt for multiple organizers, any organizer meta (like the phone number or email) will not show on the frontend-only the organizer names will be listed.
Event Website
The next section in the New Event Admin lets you (again, optionally) provide an event website:
Taxonomies
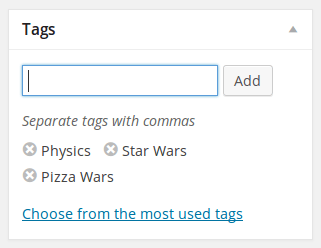
Just like regular WordPress posts you can tag events. These tags are in fact the very same tags used by WordPress itself.
This is a really useful feature: let’s say you have some blog posts about the laws of physics and are also promoting a group of events – lectures, perhaps – about the same thing. You can tag both with a suitable term like Physics and help visitors to the website find not only physics-related posts but events, too!
Besides tags, you can also categorize events:
It is worth emphasizing, though, that these are not the same family of categories as used in posts. They definitely have a very similar (in fact, identical) user interface to regular post categories – but they are in fact a distinct family of categories.
In other words, if you happen to have an existing category you use for blog posts, you should not expect it to appear in the list of event categories – and if it does, well, it just happens to share the same name (but isn’t actually the same).
Event Options
Usually found close to the tag and event category meta boxes, you can find the Event Options:
Sometimes you want to be able to link to an event post (by email, or directly via a menu) but would prefer it isn’t included in the main event views – checking the Hide from Event Listings box accomplishes just that
You might also happen to have a whole load of events taking place on the same day … naturally, that can cause some problems in month view – and so, at least by default, no more than 3 events per day are shown in that view – selecting Sticky in Month View helps you to ensure that this event is one of the ones that do show. The question mark’s help text reads, “When events are sticky in month view, they’ll display first in the list of events shown within a given day block.”
The Feature Event option allows you to designate your most important events for extra emphasis on your pages. Featured events will be highlighted in event views, archives, and widgets, making it a great choice for special engagements that you’d like to have front and center.
Event Status
Usually found in the right sidebar directly under Event Options is the Event Status option. You can choose to select from one of the following options:
Scheduled– Will list if the event is Scheduled
Canceled– Will display the word Canceled at the top of your event page; you can opt to include a reason if you prefer.
Postponed– Displays a Postponed label on your event; can include a reason if you’d like.
First please login to your WordPress Dashboard. Go to WordPress Dashboard > Events > Add New Event
Enter event title, content, featured image and you can assign this event item to event category too.
To upload featured image. Select images you want to upload as featured image for this event post. Once you finish upload it will automatically attach to this post and click “Update” to save changes.
Event Options
Event Date – Date of this event.
From – Begin time of this event.
To – End time of this event.
Event Location – Address for this event ex. 34 Kingstong Road, United Kingdom
Get Direction on Google Map (optional) – Check this option if you want to find map with direction using location above.
Buy Ticket URL (optional) – Enter URL where visitor can buy ticket for this event.
How to add event category page
Basically when you crate event categories. WordPress automatically added these pages for you. You just have to find the url of it or add it to main menu. Open Appearance > Menus and select for example “Event Categories” you want to add to main menu.
But if you couldn’t see this option. Click “Screen Options” at the top right of edit menu page and check “Event Categories” options.
Event Category Page Layout Settings
You can change event category page layout setting using Events > Event Categories. Click on category you want to edit and select “Event Category Page Template”.
Create a Event Page using Page Template
Once you create event posts. To display your event on page, you have to create a event page. Here are the steps to create a event page.
Go to WordPress Dashboard > Pages and click Add New
Add page title and content. Then find Template option on the right sidebar.
Select template begin with Event… as page template.